The store will not work correctly when cookies are disabled.
We collect user information to provide a better user experience and protect the security of our website. By continuing to use our website, you acknowledge the use of cookies.
Drop your email below and we'll be first to let you know.
Special Price$46.21Regular Price$54.94
Quick Overview
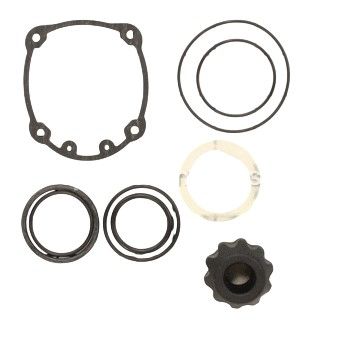
The Grip-Rite GRRBK200 Rebuild Kit is a complete solution for repairing and optimising the functionality of pneumatic tools. It comprises commonplace accessories, including seals, gasket, and O-rings that are used for fixing and replacing worn or damaged parts of small hand-held power tools including staplers or nail guns. This rebuild kit makes your tools to last longer, increase its efficiency and minimize on time wastage. This is suitable for contractors, DIYers and professionals who use pneumatic tools for tasks, since it will serve them right and they will not have to spend money to buy new tools.
What maintenance is required for the Grip-Rite GRRBK200 Rebuild Kit?
Before using rebuild kit components, disassemble the affected tool or assembly and thoroughly clean old grease, corrosion, and debris. Check mating parts for wear or damage and replace any that aren't serviceable. Apply fresh grease or recommended lubricant during reassembly to ensure smooth operation. Follow all torque recommendations to avoid over-tightening or loosening.
What are common issues with the Grip-Rite GRRBK200 Rebuild Kit?
Pins loosen with use.
Seals compress unevenly.
Moving parts become stiff or jammed.
Rebuilt unit does not operate smoothly.
Please, mind that only logged in users can submit questions
We strive to provide our customers with a hassle-free and efficient shopping experience. Our shipping policy ensures the timely delivery of your orders and complete customer satisfaction. View More
We are committed to ensuring your complete satisfaction with every purchase. We understand that circumstances may arise where you must return a product or request a refund. If for any reason you are not satisfied, you may return the item(s) according to the terms outlined below. View More
This Payment Policy outlines the terms and conditions governing all payments made for products purchased through our website. By making a purchase, you agree to be bound by this Payment Policy. View More
Installation Steps
Step1: Disassemble the tool or component requiring rebuild.
Step2: Remove worn parts and retain any reusable fasteners.
Step3: Clean the housing and contact surfaces.
Step4: Install new rebuild parts per orientation in the kit.
Step5: Reassemble components in reverse order of disassembly.
Step6: Tighten fasteners evenly.
Step7: Operate the tool to confirm proper rebuild function.

Validate your login