The store will not work correctly when cookies are disabled.
We collect user information to provide a better user experience and protect the security of our website. By continuing to use our website, you acknowledge the use of cookies.
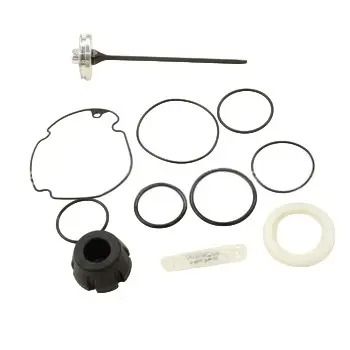
The Grip-Rite GRRBK300 Rebuild Kit is a complete set that helps to bring back the functionality of your air compressor. It entails all features for instance gasket, seals, piston rings and valve that are central to compressor efficiency. This kit operates through replacement of worn out parts to ensure that your equipment is in proper working order and lasts longer. Especially useful for projects, it saves costly replacement and lost time. The GRRBK300 is more affordable, returns power efficiency, and guarantees proper air pressure.
What maintenance is required for the Grip-Rite GRRBK300 Rebuild Kit?
Before installing components from the rebuild kit, clean the tool or assembly thoroughly to remove old grease, debris, and worn parts. Inspect mating surfaces and replace any damaged fasteners to ensure a proper fit. Apply the correct lubricant to moving parts during reassembly to reduce friction. Follow manufacturer torque specs to prevent over-tightening and maintain optimal function.
What are common issues with the Grip-Rite GRRBK300 Rebuild Kit?
Components damage quickly after installation.
Pins or bushings loosen.
Alignment becomes inconsistent.
Seals fail under pressure.
Please, mind that only logged in users can submit questions
We strive to provide our customers with a hassle-free and efficient shopping experience. Our shipping policy ensures the timely delivery of your orders and complete customer satisfaction. View More
We are committed to ensuring your complete satisfaction with every purchase. We understand that circumstances may arise where you must return a product or request a refund. If for any reason you are not satisfied, you may return the item(s) according to the terms outlined below. View More
This Payment Policy outlines the terms and conditions governing all payments made for products purchased through our website. By making a purchase, you agree to be bound by this Payment Policy. View More
Installation Steps
Step1: Disassemble the tool or component per manufacturer instructions.
Step2: Remove worn or damaged parts included in the rebuild kit.
Step3: Clean all mating surfaces and remove debris.
Step4: Install new components from the rebuild kit in correct order.
Step5: Lubricate moving parts if required.
Step6: Reassemble the tool or component fully.
Step7: Test operation to confirm proper rebuild and function.

Validate your login