The store will not work correctly when cookies are disabled.
We collect user information to provide a better user experience and protect the security of our website. By continuing to use our website, you acknowledge the use of cookies.
Drop your email below and we'll be first to let you know.
$520.06
Quick Overview
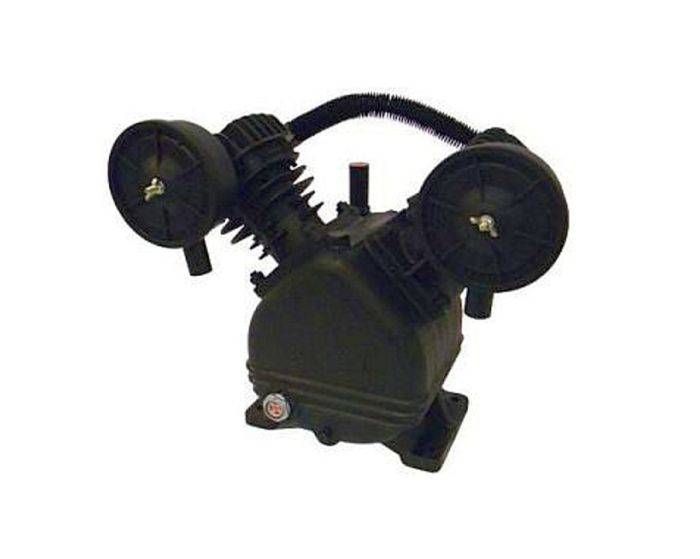
The Powermate S040-0469 Pump Assembly is a high quality replacement pump for air compressors, featuring high quality airflow and pressure control. It is built with durable materials, and is designed for long life in harsh environments. Designed for easy installation, this pump assembly makes it easy for users to quickly restore, or even improve, their air compressor’s functionality. It has a compact but robust design which maximizes efficiency and minimizes energy consumption. The pump is a consistent performer, and is ideal for powering pneumatic tools, inflating tires and more. It is a reliable construction that cuts down downtime and maintenance costs and thus a valuable asset for home and industrial applications.
What maintenance is required for the Powermate S040-0469 Pump Assembly?
Check the pump assembly regularly for leaks, loose fittings, or worn seals that reduce pressure and efficiency. Drain moisture from the pump and associated lines after each use to prevent corrosion and freezing. Ensure all bolts and connections are torqued to spec and inspect hoses for cracks. Proper lubrication of moving parts helps extend pump life and maintain consistent performance.
What are common issues with the Powermate S040-0469 Pump Assembly?
Pump fails to build pressure.
Seals leak fluid.
Valves stick intermittently.
Flow rate drops under load.
Is the Powermate S040-0469 Pump Assembly compatible with all Powermate air compressors?
No. This pump assembly is designed for specific Powermate air compressor models that support the S040-0469 configuration. Always verify your compressor model number and mounting layout before purchasing to ensure proper fitment and pressure performance.
Why is my Powermate pump assembly not building air pressure properly?
Common causes include worn internal seals, damaged reed valves, loose air fittings, or overheating from extended compressor operation. Inspect the pump assembly for leaks, abnormal noise, and restricted airflow to identify the issue before replacement.
Can I replace the Powermate Pump Assembly myself?
Yes. Many users perform the replacement using standard hand tools. Before installation, disconnect power, release all tank pressure, and carefully align the pulley and mounting hardware. Following the compressor service manual helps ensure safe and correct installation.
What does the Powermate S040-0469 Pump Assembly do in an air compressor system?
The pump assembly compresses incoming air and delivers pressurized air into the compressor tank. It is one of the primary operating components responsible for pressure generation, airflow efficiency, and overall compressor performance.
Please, mind that only logged in users can submit questions
The Powermate S040-0469 Pump Assembly commonly helps resolve these air compressor performance issues: Common Symptoms Addressed: • Compressor fails to create full tank pressure. • Excessive vibration during operation. • Oil leaks around the pump assembly. • Pump overheating during extended use. • Unusual knocking or rattling noises from the compressor head. Low Pressure Output Quick Check: Inspect the pump assembly for worn seals, cracked fittings, or loose mounting bolts. Fix Suggestion: Replace damaged seals and confirm the Powermate pump assembly is properly aligned and tightened to manufacturer specifications. Prevention Tip: Regularly inspect intake filters and avoid exceeding recommended compressor duty cycles. Excessive Pump Vibration Quick Check: Verify that the pump assembly mounting hardware is secure and the pulley alignment is correct. Fix Suggestion: Tighten loose hardware and inspect for worn vibration isolators or bent pulleys affecting the pump assembly. Prevention Tip: Keep the compressor on a level surface and perform periodic belt alignment checks. Pump Overheating Quick Check: Examine airflow around the compressor and check for clogged cooling fins on the pump assembly. Fix Suggestion: Clean debris from cooling surfaces and confirm the compressor is operating within the recommended pressure range. Prevention Tip: Allow cool-down periods during heavy use and maintain proper ventilation around the compressor unit. Unusual Knocking Noise Quick Check: Listen for internal knocking from worn bearings or loose pump components. Fix Suggestion: Inspect the Powermate pump assembly for internal wear and replace damaged moving components if necessary. Prevention Tip: Maintain correct oil levels where applicable and avoid running the compressor continuously for long periods. Customer Experience: Many users replacing the Powermate S040-0469 Pump Assembly reported smoother compressor startup and more stable pressure recovery after installation. Several DIY users also mentioned that correcting pulley alignment during replacement noticeably reduced vibration and operating noise.
We strive to provide our customers with a hassle-free and efficient shopping experience. Our shipping policy ensures the timely delivery of your orders and complete customer satisfaction. View More
We are committed to ensuring your complete satisfaction with every purchase. We understand that circumstances may arise where you must return a product or request a refund. If for any reason you are not satisfied, you may return the item(s) according to the terms outlined below. View More
This Payment Policy outlines the terms and conditions governing all payments made for products purchased through our website. By making a purchase, you agree to be bound by this Payment Policy. View More
Installation Steps
Step1: Disconnect power and release system pressure.
Step2: Drain any remaining fluid from the unit.
Step3: Remove mounting bolts and disconnect hoses.
Step4: Position the new pump assembly onto the frame.
Step5: Secure with mounting hardware evenly.
Step6: Reconnect hoses and fittings tightly.
Step7: Restore power and test for proper operation and leaks.


Validate your login